
Do you hate having to carry around a tube of lotion? Or maybe you don’t like how greasy your hands feel after using traditional lotion? I know the feeling. Plus, as a frequent traveler, lotions are hard to bring because they must be in TSA-approved sizes for carry-on luggage.
These solid beeswax lotion bars are the perfect way to keep your skin moisturized when traveling. They are also perfect zero-waste moisturizers since there is no tube or bottle to throw out. This homemade lotion bar recipe uses essential oils and beeswax for deeply nourishing your skin.

What are Lotion Bars?
Solid lotion bars have all of the skin softening ingredients of a traditional lotion. They are perfect for spot treatments, such as if you have a dry patch of skin or want to concentrate on your feet or hands. However, they work for whole-body moisturizing, as well.

To apply, you rub the lotion bar onto dry skin. Your body heat will slightly melt the lotion as it is in contact with your skin. Then you can rub in the lotion ingredients as you would with normal lotions.
P.S. You can make lotion bars into massage bars, too, just like my lemon poppyseed soap massage bars. You just need a massage bar soap mold.
To apply to your hands, rub your hands with it like you would a bar of soap. Just don’t add water! Then rub your hands together to coat all over the hands.
These bars are ideal for anyone that would like zero-waste beauty products. As well as frequent travelers, and anyone looking for a unique way to moisturize their skin.
Another zero-waste, homemade lotion recipe is our easy Whipped Coconut Oil lotion.
For very dry skin, try my DIY Soothing Winter Skin Balm.
Lotion Bars Make Great Gifts!
If you are looking for an easy homemade gift to make, these solid lotion bars are great! See my Vanilla Homemade Lotion Bars for another DIY gift idea, too.
They are so simple to make. Yet it looks like spent a lot of time making them! And since lotion bars are kind of unique, your friends and family will be amazed to receive one.
Wrap up each bar in cellophane or tissue paper for a pretty presentation or stocking stuffer. Or, you can add several in a glass jar for a pretty display.
Or stack multiple lotion bars on top of each other and tie with a ribbon.
I suggest adding cupcake liners or parchment paper in between each bar so they don’t stick together.

Use some of your beeswax to make these easy Beeswax Lip Balms for perfect gifts, too!
You might also like these DIY beauty products to give as gifts, too:
- Silky Essential Oil Bath Fizzies
- Christmas Tree Bath Bombs
- Chocolate Mint Lip Balm
- Goat Milk Melt and Pour Soap Recipes
How to Customize the Bars
I chose to make an Uplifting scent for these solid lotion bars. I used Siberian Fir, Lemongrass and Grapefruit essential oils. Together, the fragrances help to uplift your mood and feel more relaxed.
You can choose any combination of essential oils that you like. Here are some ideas:
- Citronella and lavender to ward off mosquitoes
- Pine scent for men’s lotion bars
- Peppermint and wintergreen for Christmas

Lotion Bar Molds to Use
Using different lotion bar molds can also help to customize them. For instance, a heart shaped mold is great for Valentine’s Day. While a tree-shaped mold is perfect for Christmas. Flower molds are great for Mother’s Day.
Tree shaped molds can also be used for our natural Christmas tree soaps.
Whatever mold you would like, a silicone mold is the easiest to use. You can bend the mold away from the bar to easily take it out. The silicone molds are flexible and reduce stress in trying to get the bars out without damaging them.
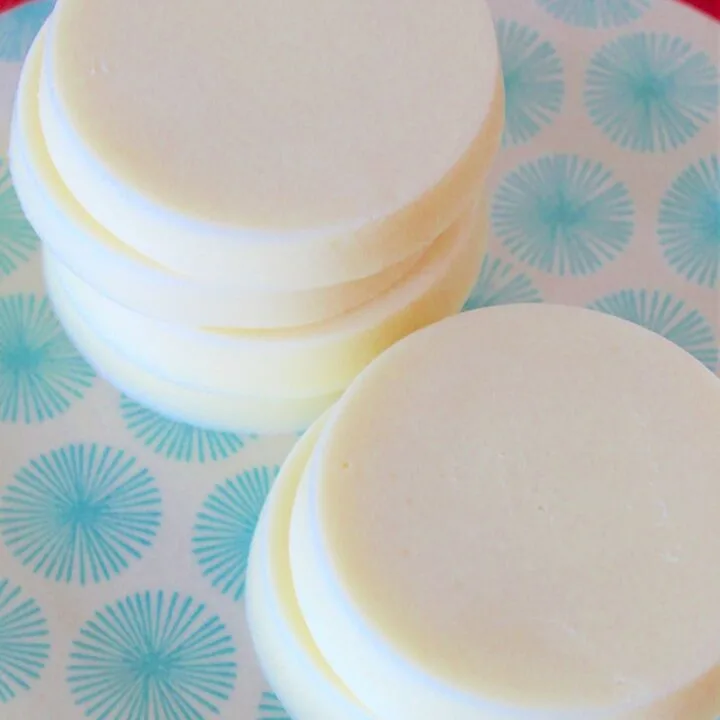
In this recipe, I used a silicone mold that is thinner in depth than many others. However, they have a nice wide circular shape. I like to use these for lotion bars and soaps since they aren’t as thick and bulky.

Other molds will work just fine. They might make a different amount of bars, though. For this recipe, I was able to make 5 to 6 bars.
You don’t even have to use a mold if you don’t want to. You could add the mixture to a baking ban or loaf pan and cut into slices once cooled. Or use muffin tins.
Helpful Tips
- I suggest using the beeswax pastilles if you can, just to help make the melting process easier, but if you have the brick type of wax, just have it chopped up well before you begin.
- You can melt the shea butter directly into the beeswax instead of microwaving it first. However, it adds a good amount of time to the process and I learned to do it with the microwave instead.
- Shea butter is naturally very soft and sticky, but it takes longer to melt than you may expect. I like to do it in small intervals to be safe and keep it from boiling over and making a mess.
- If you find that you are using a spoon to stir the wax mixture and then having it become covered in sticky wax, you can use a second spool to scrape the first and return the wax easily to the pot to melt again.
- The bars will slowly turn a creamy yellow color and lose the clear look. The amount of time this takes will depend on your mold, but expect about 1-2 hours.
- If you press your finger into the top of the bar, it can leave a mark, so I don’t encourage you to try it that way. Instead, feel the underside of the mold to see if it has cooled.

Beeswax Lotion Bars
This recipe makes 6 bars using these molds. Expect 1-2 hours of time to cool.
A printable recipe card is available below.
Ingredients
- 1 cup shea butter, chopped
- ¾ cup beeswax pastilles or finely chopped beeswax
- ½ cup coconut oil
- 15 drops Siberian Fir essential oil (or Balsam Fir essential oil)
- 12 drops lemongrass essential oil
- 13 drops grapefruit essential oil
Directions
Step 1
Use a double boiler to melt the ingredients. Place water in the bottom half of the boiler and fill it to around ⅔ full. Then add beeswax to the top half and place the boiler over medium-high heat. It will take a few minutes for the water to get heating up well and melting the wax.
Be sure not to let the water boil over, as this can burn the wax and damage it. Stir the wax every few minutes and break up the clumps to help it melt faster.

When you hear the water beginning to bubble and get hot, lower the temperature to a low simmer to avoid boiling over.
Step 2
Add shea butter into a glass measuring cup. Place in the microwave and heat for about 45 seconds. Using a rubber spatula, stir the shea butter and scrape down the sides of the bowl. Then microwave for another 45-60 seconds.
Continue to microwave until it is clear and liquified.
Step 3
Once the beeswax has become liquefied, add in the coconut oil. Stir the mixture together until completely melted.
Step 4
Next, add in the essential oils. Stir well to disperse all of the oils throughout the lotion bar mixture.

Step 5
Add the shea butter into the beeswax and coconut oil mixture. If it has thickened up, you can microwave it for a few seconds to liquify again.

If your boiler pot is small, you may want to mix the ingredients together in a larger bowl, however, mixing it over heat helps keep the mix melted.
You should have a clear, yellowish liquid that will be easy to pour.
Step 6
Lay lotion molds on a flat surface.
Slowly pour the mixture into the molds until they are filled to just below the top.

You will need to let them sit and cool down completely, without moving them for a few hours. Test to see if they are cooled by feeling the bottom of the mold under a bar to see if it is still warm or not. Once cooled, remove from the molds.
The photo below shows how the colors of the bars will change as they cool down.

Be sure to Pin This recipe to save for later!

You might also like our Coffee Sugar Scrub recipe, too.
Get the printable recipe card:
Beeswax Lotion Bar Recipe with Essential Oils
These solid beeswax lotion bars are simple to make, zero-waste and perfect as gifts. Customize fragrance with essential oils.
Materials
- 1 cup shea butter, chopped
- ¾ cup beeswax pastilles or finely chopped beeswax
- ½ cup coconut oil
- 15 drops Siberian Fir essential oil (or Balsam Fir essential oil)
- 12 drops lemongrass essential oil
- 13 drops grapefruit essential oil
Tools
- Double Boiler
Instructions
- Use a double boiler to melt the ingredients. Place water in the bottom half of the boiler and fill it to around ⅔ full. Then add beeswax to the top half and place the boiler over medium-high heat. It will take a few minutes for the water to get heating up well and melting the wax. Be sure not to let the water boil over, as this can burn the wax and damage it. Stir the wax every few minutes and break up the clumps to help it melt faster. When you hear the water beginning to bubble and get hot, lower the temperature to a low simmer to avoid boiling over.
- Add shea butter into a glass measuring cup. Place in the microwave and heat for about 45 seconds. Using a rubber spatula, stir the shea butter and scrape down the sides of the bowl. Then microwave for another 45-60 seconds. Continue to microwave until it is clear and liquified.
- Once the beeswax has become liquefied, add in the coconut oil. Stir the mixture together until completely melted.
- Next, add in the essential oils. Stir well to disperse all of the oils throughout the lotion bar mixture.
- Add the shea butter into the beeswax and coconut oil mixture. If it has thickened up, you can microwave it for a few seconds to liquify again. If your boiler pot is small, you may want to mix the ingredients together in a larger bowl, however, mixing it over heat helps keep the mix melted. You should have a clear, yellowish liquid that will be easy to pour.
- Lay lotion molds on a flat surface. Slowly pour the mixture into the molds until they are filled to just below the top. You will need to let them sit and cool down completely, without moving them for a few hours. Test to see if they are cooled by feeling the bottom of the mold under a bar to see if it is still warm or not. Once cooled, remove from the molds.
Notes
- I suggest using the beeswax pastilles if you can, just to help make the melting process easier, but if you have the brick type of wax, just have it chopped up well before you begin.
- You can melt the shea butter directly into the beeswax instead of microwaving it first. However, it adds a good amount of time to the process and I learned to do it with the microwave instead.
- Shea butter is naturally very soft and sticky, but it takes longer to melt than you may expect. I like to do it in small intervals to be safe and keep it from boiling over and making a mess.
- If you find that you are using a spoon to stir the wax mixture and then having it become covered in sticky wax, you can use a second spool to scrape the first and return the wax easily to the pot to melt again.
- The bars will slowly turn a creamy yellow color and lose the clear look. The amount of time this takes will depend on your mold, but expect about 1-2 hours.
- If you press your finger into the top of the bar, it can leave a mark, so I don’t encourage you to try it that way. Instead, feel the underside of the mold to see if it has cooled.
Recommended Products
As an Amazon Associate I earn from qualifying purchases. I earn from other affiliate programs, as well.
-
 USDA Organic Shea Butter by Sky Organics (16 oz) 100% Pure Unrefined Raw African Shea Butter for Face and Body Moisturizing Natural Body Butter for Dry Skin
 -
 Organic White Beeswax Pellets (1lb) by Sky Organics 100% Pure USDA Organic Bees Wax Pesticide-free Triple Filtered, Easy Melt Beeswax Pastilles for DIY Candles Skin Care Lip Balm
 -
 Viva Naturals Organic Extra Virgin Coconut Oil, 16 Ounce
 -
 NOW Essential Oils, Lemongrass Oil, Uplifting Aromatherapy Scent, Steam Distilled, 100% Pure, Vegan, Child Resistant Cap, 4-Ounce
 -
 NOW Essential Oils, Grapefruit Oil, Sweet Citrus Aromatherapy Scent, Cold Pressed, 100% Pure, Vegan, Child Resistant Cap, 1-Ounce
 -
 Stainless Steel Double Boiler Pot with 600ML for Melting Chocolate, Candy and Candle Making (18/8 Steel, Universal Insert)
J. Pautler
Thursday 17th of August 2023
These are pretty sticky. If you don't like the stickiness of lotions you won't like these! I'm going to try using it as an in shower moisturizer. Maybe it will be better when it's rinsed off.
Angelika
Thursday 20th of May 2021
This is amazing and looks like it would make a very fun gift for a friend or co-worker! I love this idea and will try it out!